Headscarf and roller in hand. It is time to personalize the walls yourself with these techniques and ideas do it yourself. Choose between gradients, stucco, stripes, polka dots, shapes …
DEGRADED EFFECT

Paint the entire wall the lightest color you have chosen. Measure the wall and mark the height you want to reach with the darkest shade. Paint with the second color up to the line and with a dry brush smudge the edge while the paint is still wet. A proposal from Bruguer.
SHAPES

To discard or frame an element. Make a circle, a square, a rectangle, a triangle … the geometric element that best fits you. You need to make a template (in the case of circles, rhombuses and triangles) on paper and put it on the wall. Marking with masking tape ensures perfect edges and filling. Look here at the game on the wall, which frames the ceiling lamp in perspective. An idea from Bruguer.
CHECKED

Checkered and colored. It is about making a grid on the wall. It is important to measure very well so that the lines are straight and the squares are identical. Then plan the colors with which you are going to fill each square so that no two colors are the same together. Make a cutlet out of a piece of paper and distribute them before posting them to the wall.
TOPS

Simple, take advantage of the smooth painted wall to splash it with colored dots. You can do them in an irregular way, with the tip of a brush or circular brush. Take care of the finish by carefully filling in the circles you draw or use a circular strip (the base), impregnate it with paint and use it as a stamp.
HANDMADE COLOR STRIPES

With a blurry appearance, these colored stripes will brighten up a wall. How are they made? Paint the wall with a base color. Next, you need to measure and mark how high you want to paint. Make marks based on the thickness of the horizontal stripes at each end of the wall. With the help of a string, join these marks and draw a line. They will serve as a guideline for painting. With a brush and a small amount of paint, paint the lines between the marks. Don’t apply too much pressure as the idea is to get a blurry effect. It’s about the stripes not being perfect. It is a proposal from the Bruguer painting firm.
VERTICAL STRIPES

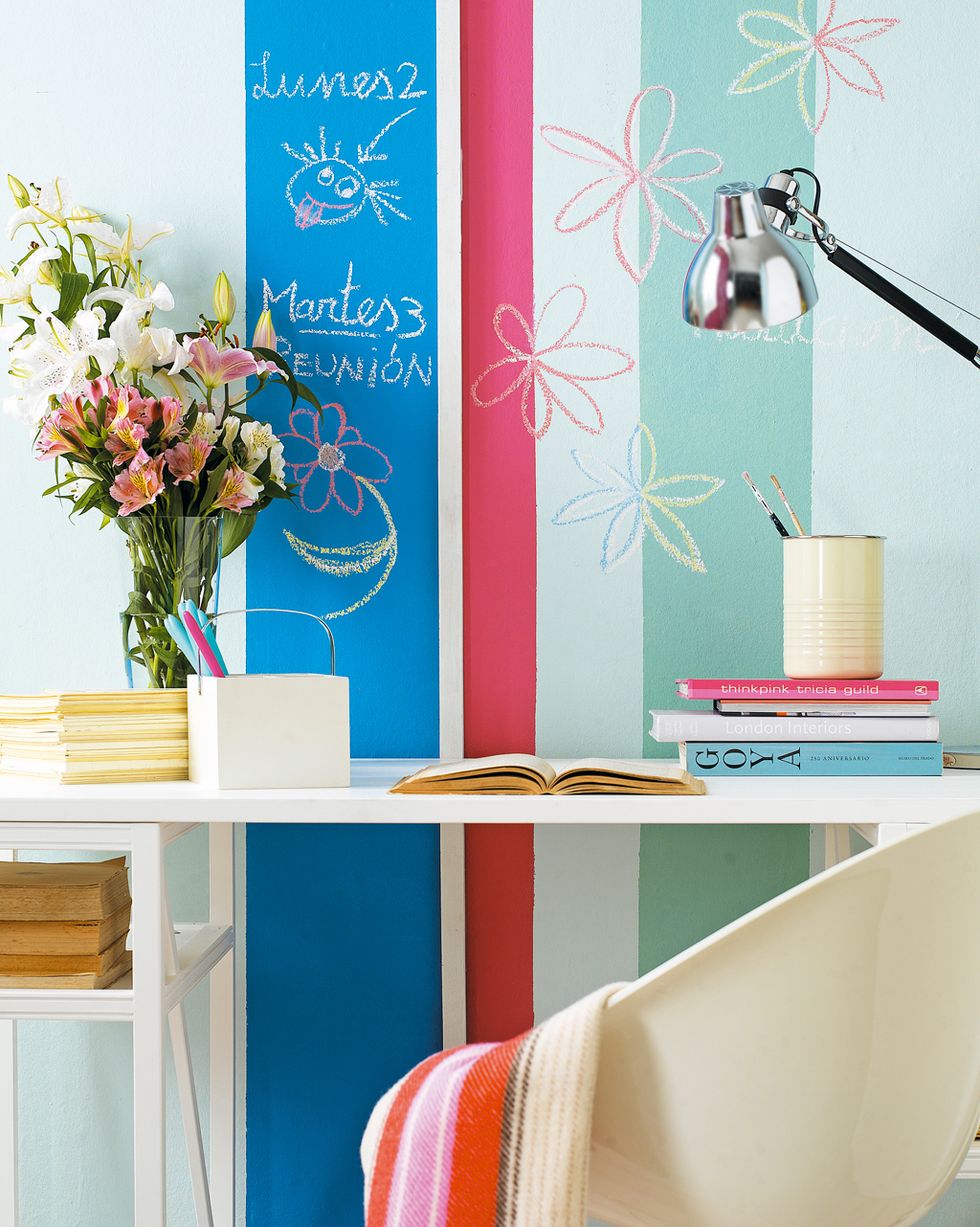
And we go with the verticals. One base color and three vertical stripes of different thickness each in one color. The peculiarity is that blackboard paint has been used to put messages on it. How? Base paint. Wait for it to dry. Measure the stripes and mark them with painter’s tape at the top of the entire wall. Then fill in the chosen color and remove the tape (always pulling towards the inside of the strip) before the paint is completely dry.
TWO COLORS AND CENEFA

A different color for a wall and a border that extends on both. It involves painting a cloth in a contrasting tone and placing the border at the desired height. When the paint is dry, measure how high you want the border to be. Make several marks to guide you (you can help yourself with a level) and glue the border. There are self-adhesive ones. Cenefa, by Coordonné.
STUCK WALL

A very creative technique. It takes some time but you will get this water effect for the wall. Do not use it on all the walls of a room, especially if you paint in an intense color. Here it is combined with smooth as the fuchsia tone is also very striking.
USE EFFECT ROLLERS TO CREATE TEXTURES

With the background already painted white, use a bucket to dose the paint with which you will create the effect. Ideally, you should choose a color that contrasts with the white background, so that the effect is appreciable. Taking a hair roller, insert it into the bucket to impregnate it with paint without loading it too much. Then, we will paint the wall in a single pass and letting the background show . That is, do not allow a solid color to remain, but rather have a “translucent” appearance in a way. With the wall already painted, and before the paint dries, it is time to take an effect roller to create the decorative patterns that finish giving the effect we want. You can buy these rollers already made, or make them yourself with cloths, for example. Another option if you don’t have a roller of this style is to play with a brush to create random and irregular patterns.
CREATE A DRAPED EFFECT WITH SPONGE OR CLOTH

To use this technique, you simply have to have patience and a wide-pore sponge or cloth at hand (the more variable the size of the grooves, the more “randomness” it will give to our effect). First, dampen the sponge or cloth with water, then soak it in with the monolayer paint to start creating the effect . We will give light touches to the wall and we will distribute the work along the entire surface, until the wall is completely decorated. Do you want to see an example of this result?
CREATE TEXTURES BASED ON RANDOM LINES WITH A FIBER BROOM

With this technique you can create striped textures simply using a fiber broom or a stiff bristle brush. The way to proceed is very similar to the previous ones. The background is painted in the desired color and, using a color that contrasts well with the background, a single layer paint is applied. Before it dries, use the broom to create the lines. You can give them a vertical or horizontal sense, we leave that to your liking.
PAINT A SINGLE WALL IN STRIPES

Another of the most used techniques in wall decoration is to paint a single wall with a striped motif. On this occasion, rather than looking for the contrast between colors, the contrast between textures and aspects is sought. Using this technique can help you give a greater feeling of spaciousness to your room, as well as add an avant-garde and fresh touch to your home decor. To do this, all you have to do is use masking tape to delimit the lines, a roller (we recommend that it be small in order to be more precise in painting) and monolayer paint in your favorite color.
CREATE DECORATION PATTERNS USING CARDBOARD TEMPLATES

It is one of the easiest techniques to perform. The hardest thing to do is cut the cardboard in the way you want to create the decoration pattern. Once you have the motive, just put the template on the wall and pass the roller loaded with paint over it . We recommend using a small roller and using a brush for those areas that are more difficult to reach with the roller (for example, the edges of your cardboard template).
The more complex the shape of the cardboard, the more you will have to take care when applying the paint, so our advice is that you opt for the simplest and easiest ways to trace. You can also make a mold and, with the help of a brush, paint the outline of it, but it is a job that requires much more technique and pulse than the previous method. However, it is just as valid.
PAINT A SINGLE WALL ANOTHER COLOR

Along with the previous one, it is one of the simplest methods to apply. It is used especially in rectangular and elongated rooms, since it helps to reduce the depth of the room and avoid the so-called corridor or tunnel effect, which is why, normally, the front wall is chosen to apply the color. If you want to find more information, we discuss this issue in greater detail in the post where we give several tips for painting your living room, this being applicable to any type of room.


